Concepts
Boomack is a Lightweight Presentation Server.
Its main purpose is to display hypermedia content from a publisher in a way, that it is easily consumable by a viewer via a web browser. The publisher can be a developer, an administrator, or a researcher. The viewer can be the publisher himself in a local scenario, or anybody who has access to the Boomack Server via a web browser.
In contrast with a content management system, Boomack lacks the backend in form of a web UI where a user would manually manage the content. Instead, Boomack has the Boomack API, which is well suited for frequent and often automated updates.
Even if Boomack can be used to publish fairly static content it is far more suited for presenting frequently changing information. In that regard, it is more similar to a dashboard system. But other then a dashboard system, Boomack does not come with a limited set of predefined plots and UI components and a collection of data connectors. Instead, it aims to make displaying any hypermedia content easy, and leaves the preparation of the data mostly to the API user.
The fact that Boomack does not integrate a collection of data connectors is not seen as a limitation, but instead opens the door for all sorts of not yet imagined systems and tools feeding hypermedia content to a Boomack Server.
Such systems or tools can be as simple as an interactive shell session with the Boomack Client CLI, useful as cron jobs executing scripts which e. g. feed monitoring data into the Boomack Server, or sophisticated like an IDE interactively sending code snippets or intermediate computation results to a Boomack Server for visualization.
Boomack lays some concepts on top of the web standards, simplifying the process which is necessary for a publisher to host content for the web browser.
Architecture ↑
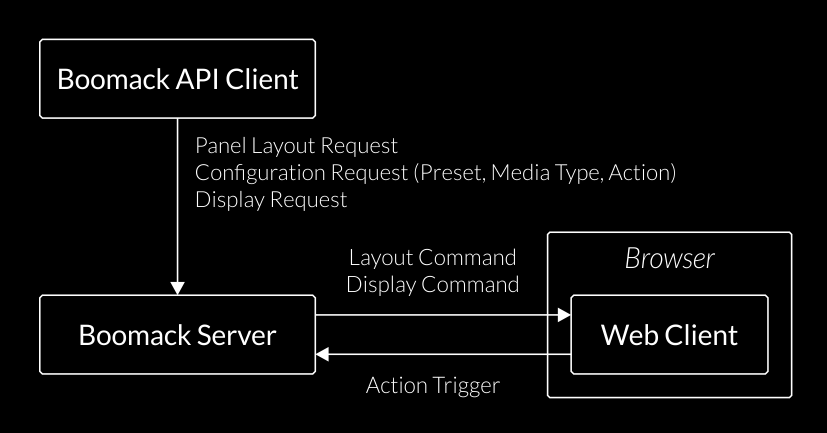
The Boomack system consists of at least a Boomack Server, a web browser, displaying the web client of the Boomack Server, and an API client which controls the Boomack Server, e. g. the Boomack Client CLI.
In a local development, prototyping, or presentation scenario, all three components can run on the same machine. But the Boomack Server can of course be configured to be reachable from other machines. Then, many users can open the web client in their browsers, and one or many API clients can send configuration and display requests to the server.
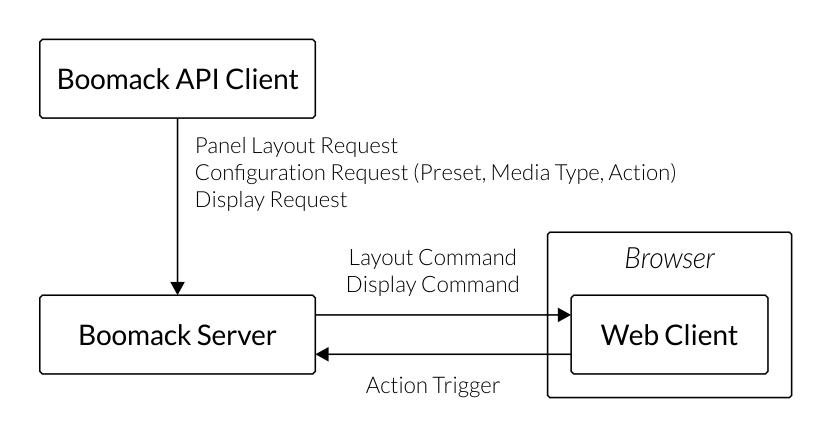
The browser, displaying the web client, requests the HTML, CSS, and JavaScript resources from the Boomack Server and establishes a Web Socket connection. The API client sends a configuration or display request via HTTP. The Boomack Server first processes the request, updates its inner state, and then pushes updates to all connected browsers via the open Web Socket connections. JavaScript code as part of the displayed content can trigger actions on the Boomack Server by sending messages back over the Web Socket connection.
Identifier ↑
There are a number of entities in a Boomack Server, which have an
identifier (ID) for management and references.
An identifier consist of the following character classes:
a-z, A-Z, 0-9, -, and _.
Valid examples:
defaultMyDemoPanel-5_abc-2211031659-cdad-44a8-a27a-be8c1a73a9cd9876543
Invalid examples:
test.txt(The dot is not allowed)a b(Spaces are not allowed)a/b(Slashes are not allowed)umläute(Characters outside the basic ASCII alphabet — a-z, A-Z — are not allowed)
a-z or A-Z was allowed as first character in an ID.
In order to allow UUIDs, GUIDs and numbers to be valid IDs,
this limitation has been lifted.Plug-In ↑
Some of the functionality of the Boomack Server is provided in the form of plug-ins. The Boomack Server comes with a couple of core plug-ins. Further the author of the Boomack Server provides a number of official plug-ins. And the community can of course publish their own plug-ins.
The plug-in page currently lists all core plug-ins and official plug-ins.
A plug-in can provide:
- Text Transformations for converting text or code into HTML
- Renderers for presenting media content
- Client Resources
to be referenced by the output of text transformations and renderers. - Action Types
Examples areshellin the core plug-inshellfor executing shell commands on the serverhttpfor calling a HTTP endpoint from the server
- Initial configuration for the server
Text Transformation ↑
Text transformations convert an input string into a different string.
The main purpose for text transformations is to convert non-HTML input text
into HTML for the browser.
Examples are syntax highlighting, wrapping plain text into
<pre><code>...</code></pre>,
or converting CSV data into an HTML table.
More complex transformations are possible,
but they should serve the purpose of visualizing the information
in the input string without altering it.
E. g. filtering or aggregating input data or executing some kind of computations on it would be considered an anti-pattern. Such kind of pre-processing should be performed outside of Boomack.
Examples of text transformations are:
highlightin the plug-incore-highlightfor syntax highlightingcsv-tablein the plug-incore-csvfor converting CSV data into a nice HTML tablemarkdownin the plug-incore-markdownfor Markdown rendering
Renderer ↑
A renderer takes an URL as input and generates HTML for presenting the given URL. The URL can be a resource URL, or an external URL. The renderer itself does not fetch the resource behind the URL. Instead the web browser displaying the HTML — generated by the renderer — fetches the URL on demand.
A very simple example of a renderer is the default download button.
It is displayed by Boomack if the server is given non-text content for display,
but the media type is unknown.
The by default a hard-coded download renderer is used, which generates
a simple link with the given URL in the href attribute:
<a class="ui large button" href="...">...</a>
Other examples of renderers are:
imagein the plug-incore-mediafor rendering images with an<img src="..." />tagpdfin the official plug-inboomack-plugin-pdffor rendering a PDF page with PDF.js by Mozilla
Client Resources ↑
To support text transformations and renderers with dependencies, a plug-in can provide
- ES modules for the web client; declared with an import map, and optionally pre-loaded
- JavaScript files / libraries which are loaded by the web client when required
- CSS style file / libraries which are loaded by the web client when required
- Additional static resources
JavaScript and CSS files are grouped under an ID for certain applications. If e. g. a renderer needs a JavaScript library and a CSS file, these two client resources can be grouped under a common ID. If the display options, then require the group ID, the web client automatically loads both client resources.
Action Type ↑
Boomack allows JavaScript code in the web client or in the displayed HTML content to call actions on the Boomack Server. To be open for a large number of different kinds of actions, they are implemented by action types from plug-ins.
Examples for action types are:
shellfrom the plug-incore-shellhttpfrom the plug-incore-httpmqttfrom the plug-inboomack-plugin-mqtt
Panel ↑
Panels are similar to web pages in that a browser window or tab can only display one panel at a time. But it comes with a lot of prepared features, to make the process of displaying content more easy then with a bare HTML page and a CSS framework.
Every panel has an ID, which must be unique
among all panels on the Boomack Server.
And every Boomack Server has at least one panel with the ID default.
This default panel can not be deleted.
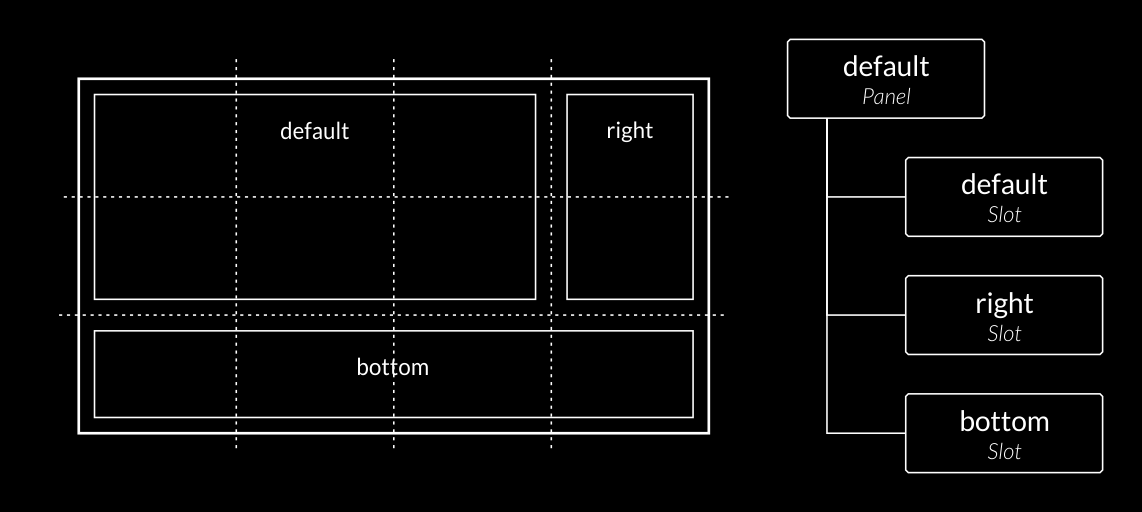
A Panel has multiple predefined layout systems. Content is not displayed in the panel directly but in slots, which are arranged by the layout system. A panel has an optional header with the title, some controls for navigation, theme selection, and export. The panel header is displayed by default but can be deactivated in the panel layout configuration. It comes with an extensive CSS framework, an icon library, multiple themes — bright and dark —, and a couple of versatile JavaScript libraries readily available.
Currently implemented layout systems are:
Currently used CSS framework is Fomantic UI with the icon library Font Awesome 5.
Currently preloaded JavaScript libraries are:
- Lodash (helpful for a more functional style of coding in JavaScript)
- jQuery (before using jQuery thou, modern JavaScript features should be considered)
Currently implemented themes are:
| Name | ID | Brightness |
|---|---|---|
| Default | default |
☀ |
| Dark | dark |
🌙 |
| Science | science |
☀ |
| Iron | iron |
🌙 |
| Green Night | green-night |
🌙 |
| Red Night | red-night |
🌙 |
| Blue Night | blue-night |
🌙 |
Grid Layout ↑
The grid layout system divides the visible area of the browser window or tab into rows and columns. The number of rows and columns is set by the API user who configures the layout for a panel. A grid layout hosts a fixed number of slots specified by the API user. For every slot, the position and extent (span) in the grid must be specified by the API user. Slots in a grid layout may overlap.
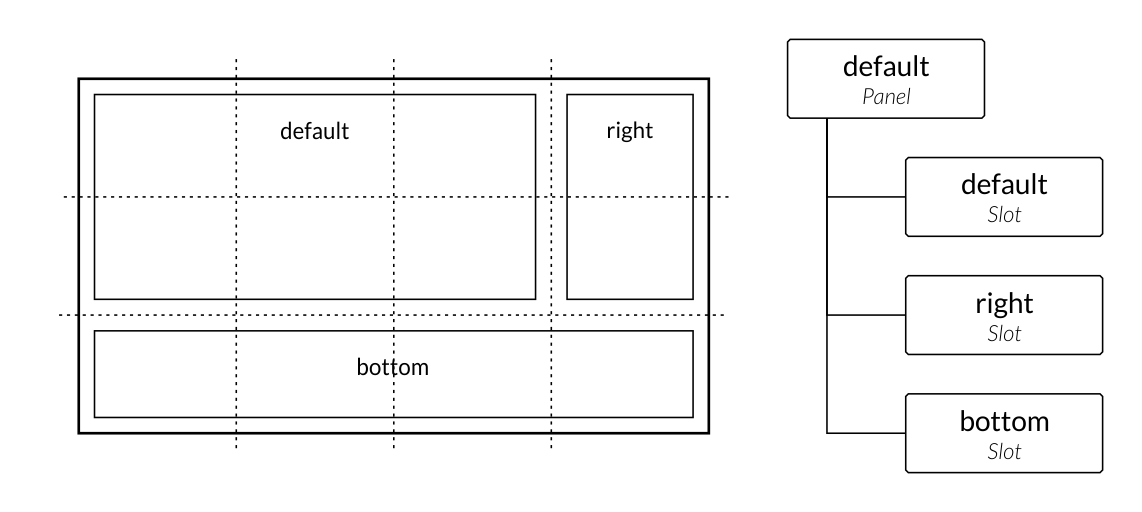
The grid layout system is well suited for dashboard or presentation scenarios where a viewer can not or does not want to scroll down a page.
Document Layout ↑
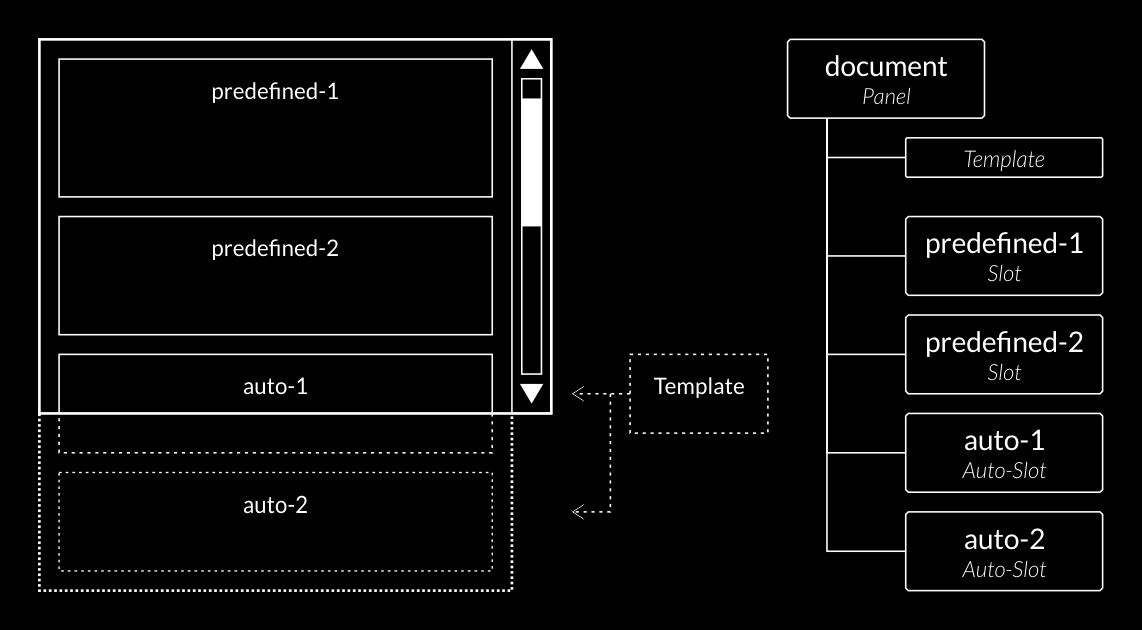
The document layout system arranges slots in a vertical stack. It can be equipped with a couple of predefined slots by the API user. But its real power lies in the fact that any number of additional slots can be created by simply sending a display request. A template for the additional slots can be configured.
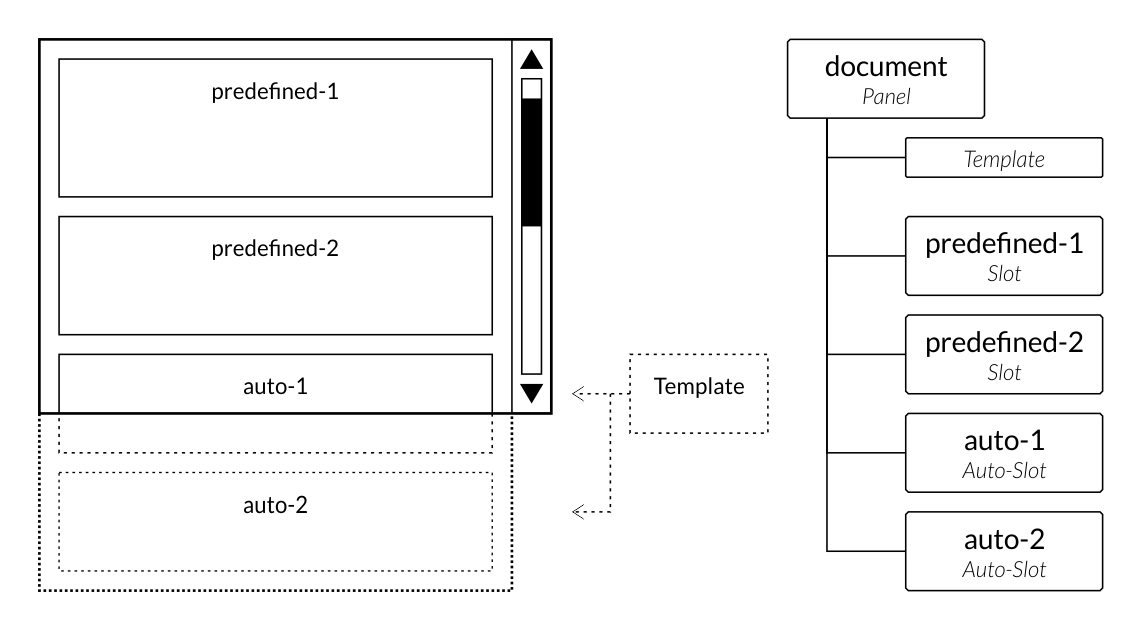
The document layout is well suited for scenarios where more area is required to display the content, than the usual browser window or tab can provide. And, where the viewer is able and willing to scroll down the page.
Layout Request ↑
A layout request configures an existing or a new panel.
The minimal example of a layout request is in fact an empty map.
Which is completed with defaults as a grid type layout with 1 row, 1 column,
and one default slot.
The minimal document layout is {"type": "document"}, which has no predefined slots
and uses a default slot template for additional slots.
For a detailed listing of all layout properties, see Panel Layout Structure.
Example of a layout request configuring a grid layout with three slots:
title: My Panel
type: grid
grid:
  columns: 3
  rows: 4
defaultSlot: b
slots:
  a: { columnSpan: 3, toolbar: false, border: false }
  b: { column: 1, row: 1, rowSpan: 3, history: 100 }
  c: { column: 3, columnSpan: 2, row: 1, rowSpan: 3 }
{
  "title": "My Panel",
  "type": "grid",
  "grid": {
    "columns": 3,
    "rows": 4
  },
  "defaultSlot": "b",
  "slots": {
    "a": { "columnSpan": 3, "toolbar": false, "border": false },
    "b": { "column": 1, "row": 1, "rowSpan": 3, "history": 100 },
    "c": { "column": 3, "columnSpan": 2, "row": 1, "rowSpan": 3 }
  }
}
Given the layout from above is stored in a file called layout.yaml,
the layout of a panel with the ID demo-panel can be updated
with the Boomack CLI as follows:
boom panel layout demo-panel layout.yaml
A new panel with the ID demo-panel, using the layout from above,
can be created with:
boom panel add demo-panel layout.yaml
boom panel layout ... and boom panel add ...
use an HTTP request to the route PUT /v1/panels/{panelId}/layout on the server.
Therefore, they can be used interchangeably.
But for the sake of easily readable scripts and idiomatic commands
on the shell, both sub-commands exist.Slot ↑
A slot is a rectangular area inside a panel. Its position and size is controlled by the layout system of the panel. A slot has an ID, which must be unique inside the panel.
A slot is the target for a single item of hypermedia content. With the exception of extensions, a slot can display only one hypermedia item at a time. But, because every HTML code fragment can be seen and displayed as one hypermedia item, this restriction is not a strong limitation in practice.
A slot comes with a couple of optional features:
- Border
- Toolbar with
- Title
- History navigation
- Pause button
- Zoom controls
- Clear button
- Maximize button
- Single-out button
- Content alignment
- Slot ID in the background when the slot has no content
Most of them are activated by default. The features can be activated or deactivated with the slot properties as part of the panel layout.
Some features are not available in all layout systems.
Slot History ↑
A slot can be configured to keep a history of the displayed hypermedia content.
The history is activated and set to a certain size with the
slot property history.
Setting the size history to 0 deactivates the feature.
Given the history of a slot is set to a size of 3, and 5 different images are send sequentially to the slot by display requests, then a viewer can use the history navigation controls in the toolbar of the slot to switch between 3 former images and the current image. The first image then was already dropped when displaying the fifth.
noPause to false.Display Request ↑
In order to display some hypermedia content on a panel inside of a slot, a display request must be send to the Boomack Server.
There are two ways to send a display request:
- Standard request
- Stream request
Standard Display Request ↑
In a standard request, a JSON or YAML structure is send to the route
/v1/display as a POST request.
The actual hypermedia content is embedded or referenced in the structure and
usually annotated with a MIME media type.
In addition, a display request contains the IDs of target panel
and target slot, the IDs of presets,
and display options.
The complete structure of a display request is documented in the API reference.
There are three options for encoding a hypermedia item in a display request:
Unicode text in a JSON/YAML string
Plain text and all kinds of markup or source code can be encoded in a JSON/YAML string. Only a little overhead is required for escaping quotes and new lines.
BASE64 encoded binary data
Images, audio files, or other binary data can be encoded as BASE64. But the encoding introduces a considerable overhead, which can reduce performance. For large hypermedia content items, e. g. videos, a stream request is better suited.
http,https, orfileURLIf the hypermedia content is reachable by the Boomack Server, either because the content can be loaded with an HTTP(S) URL, or because it is stored in the filesystem of the Boomack Server, the content may be referenced by URL. This is especially handy and performant in a local development scenario. Because the Boomack Server by default does not cache content from local file URLs, the actual data is not copied with such a display request. Only when a viewer opens the panel in his browser, the Boomack Server streams the content of the file directly to the web client.
Example for an HTTP request with three JSON encoded display requests:
POST /v1/display HTTP 1.1
Content-Type: application/json
Content-Length: 1068

[
  {
    "panel": "default",
    "slot": "a",
    "type": "text/html",
    "text": "<h1>Example for a Display Request</h1>"
  },
  {
    "panel": "default",
    "slot": "b",
    "title": "PNG Image",
    "type": "image/png",
    "data": "iVBORw0KGgoAAAANSUhEUgAAABAAAAAQCAYAAAAf8/9hAAAAAXNSR0IArs4c6QAAAARnQU1BAACxjwv8YQUAAAAJcEhZcwAADsMAAA7DAcdvqGQAAAHxSURBVDhPYyAHfHCWV3nrIF352UXBBipEHHjvJtP91kn22Ttn2f/vXaT/v3eWLYNKEQZ/LOUZP7jIPPvgIvsfhoEGZIAlfU5KcfudEFnofUBkp/8ukTl+20TyfXeKm7pt5WcCK4CCLw6yd7Ea4H5MktvvoNhtrz2i/732iv73BNKee0T+A/nPvPYITTc7JWQOUvffTO70Fwe5/x/RDQABvwMiUj77xVo894ru8ton9sRzN8QQz32i/10OiPy3Oi68ZVadWNVvS+ndP21kwIagGIAOPHaJSHjuFgvw2Cs8y3uX8BvXQyL/LU+KfgvdJFr901Z2+UdQQDrLZkKV4wceu4SZgd464HJI9L/GFaGzt4Klkj85yRBvgOcuAT/ng6KfLU6IPCybIZH9x0p2N0EX+K+VYPLbIezru130iONB4T8Ox0TmHUiTqvtvIXflm50s7jBw2yWk775fvN1jj+hN9z3iT9z2iUw2PieoBpL7byFz5YsjWjQ67xNg8tkn4uaxT6LHY4/YCe/dope994rM8tkh5um6SZgdbCoUfHKUuw/TDDfAc6eQTwAwEfkdEyn3OSFh5LhPkhmqHgN8cJQteQ8MPBQDSAXvHCRDPrrKvH8PMSAHKkwa+GQvZ/LeUf79O2f5GqgQ6eCZlZL6KycpYwBqGfKFui6GJQAAAABJRU5ErkJggg=="
  },
  {
    "panel": "default",
    "slot": "c",
    "title": "Not from here",
    "type": "image/jpeg",
    "src": "https://bit.ly/3tgSmpM",
    "options": { "scale": "none", "align": "center" }
  }
]
Example of a display request with the Boomack CLI:
boom display -l default/b -t text/html -s "<h1>Example for a Display Request</h1>"
Stream Display Request ↑
For large media content, the standard request is not the best choice. Because binary data must be BASE64 encoded to get transported inside a JSON or YAML formatted data structure, a considerable overhead — times 1.5 — is introduced in terms of data size. But even more important is the fact, that the Boomack Server has to hold the complete JSON or YAML encoded request in memory (RAM) to be able to parse and decode it.
A stream request on the other hand, can be processed without holding all data of the request in memory. By default, the Boomack Server caches large media content on disk. If a stream request is received, only a small chunk of the received data is hold in memory and then stored on disk at every given point in time. When a viewer then opens a panel in his browser and wants to display a large media item like a video, the browser requests the media item from the Boomack Server, which streams the data directly from disc. Again, without holding the whole media item in memory.
Stream display requests are HTTP POST requests to the routes:/v1/panels/{panelId}/display, and/v1/panels/{panelId}/slots/{slotId}/display.
The details of how to build a stream display request are described in the API reference.
Example of a truncated HTTP request:
POST /v1/panels/default/slots/main/display HTTP 1.1
Content-Type: image/png
Content-Length: 12034
X-Boomack-Title: My%20Image
X-Boomack-Options: eyJjYWNoZSI6ImVtYmVkIn0=

...BINARY DATA OF THE IMAGE...
Streaming a large file with the Boomack CLI:
boom display -l default/b -t video/mp4 -f large-video.mp4
The Boomack CLI automatically chooses between standard and stream request.
Content-Length header field is not set
— this is e. g. the case if you pipe data into the Boomack CLI —
and therefore the Boomack Server does not know how much data to expect in the request,
it can not apply the caching thresholds to automatically
determine the best way for holding the media content.
Therefore, it automatically streams the media content into a file on disc.
That way it is always prepared for a large amount data.
If you are sure your data is small enough and you want the Boomack
server to hold the media content in memory (RAM) instead,
use the display option cache = memory.Piping a resized image into the Boomack CLI:
magick large-image.png -resize 240 jpg:- | boom display -l default/b -t image/jpeg -o cache=memory
ImageMagick is used for resizing the image.
Display Command ↑
The display request can not be delivered to the web client in a browser as it is. It needs to be processed in some way. The included or referenced media content potentially needs to be transformed and stored by the Boomack Server for later requests by the web client. The request must be normalized and complemented with defaults. And the sometimes HTML code for presenting a resource needs to be rendered. A part of this process is the media processing pipeline.
The result of the media processing pipeline is a display command. It contains the HTML code, which will be send to the web client to be inserted into the target slot. And optionally links to a resource, which can be requested by the HTML code — and potentially included JavaScript code — with a resource URL.
Further the display command contains some instructions for the web client about how to set up the slot when inserting the HTML code.
Resource ↑
A resource in the Boomack Server is some media content which can be requested from the web client with a normal HTTP GET request. For that purpose every resource has a resource URL. A resource is generated when processing a display request and linked to the resulting display command.
There are three kinds of resources:
- In-memory resource
- File resource
- Path resource
An in-memory resource references a BLOB in the memory (RAM). A file resource references a cache file in the filesystem of the Boomack Server. A path resource references an arbitrary file in the filesystem of the Boomack Server.
Resources are discarded at some point. A reason to discard a resource can either be that it is not needed anymore, or that it needs to be deleted to respect the caching limits from the server configuration. A resource is not needed anymore if the display command, linking to the resource is discarded.
Anyways, the three kinds of resources are handled differently when discarded. An in-memory resource releases the allocated memory, freeing it up for other in-memory resources. A file resource deletes the associated cache file. A path resource just discards the path to the associated file — the file stays in tact.
Media Processing Pipeline ↑
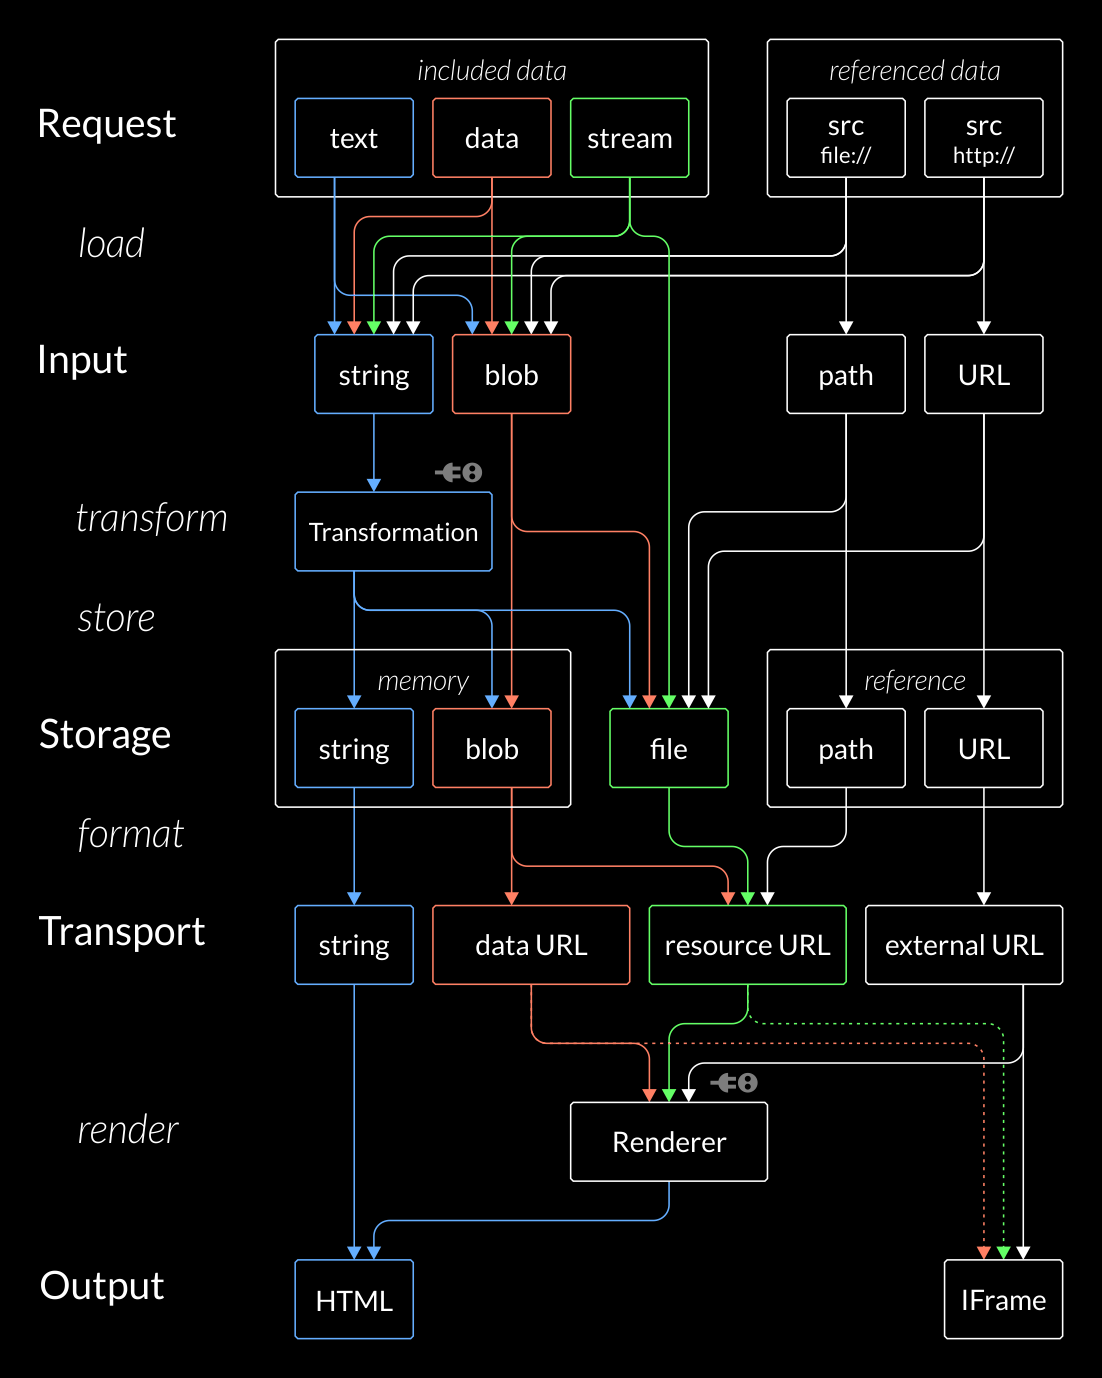
When a display request is received by the Boomack Server, it is processed by the media processing pipeline. The output of the pipeline is a display command, which is associated with the target slot. The display command contains HTML code to be put into the target slot. And optionally, a resource is generated, holding media data to be rendered by a renderer. The following diagram shows the pipeline with its alternative paths for the media content.
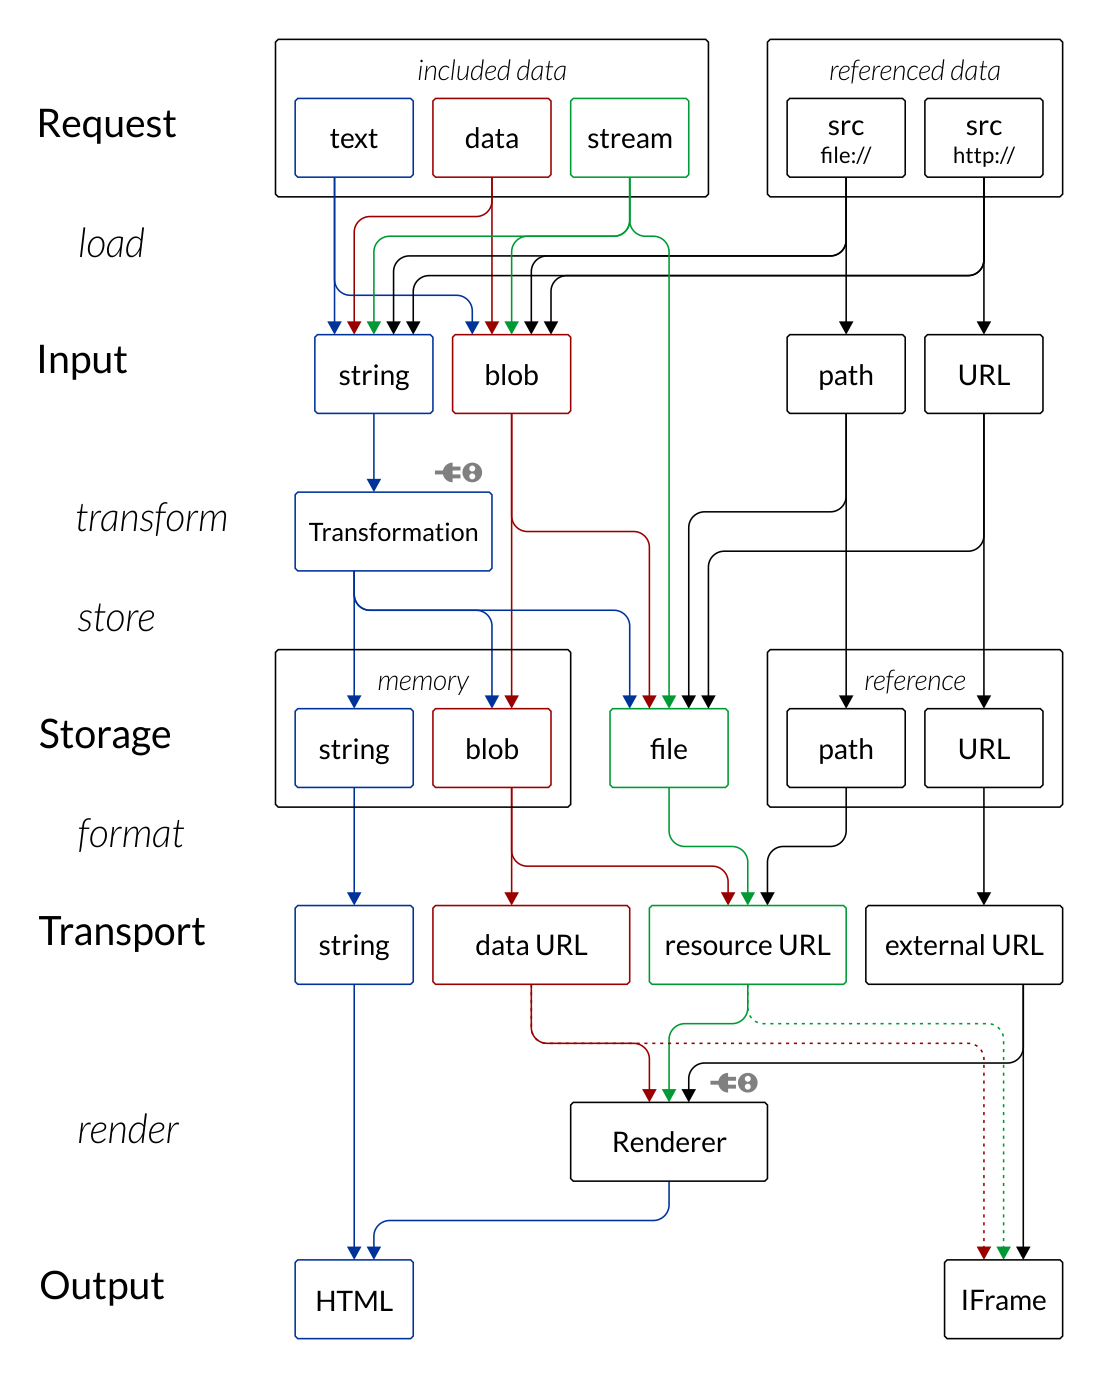
Media content can be included or referenced in a display request.
In a standard request, the content
can be included as string in the text property
or as BLOB in the data property.
Alternatively, the content can be referenced by the src property.
In a stream request, the content is included
in the HTTP request body, and processed as a stream.
In the beginning of the pipeline, the system makes the following decisions:
- Is the content text or binary data?
This question is answered by the media type. - Is a text transformation required?
This question is answered by the display optiontransformation. - Will the content be converted into HTML or presented by a renderer?
This question is answered by the display optionrenderer. - Is a resource needed?
If the content is rendered by a renderer, a URL is needed for the renderer to be able to load the media content. The content can be referenced with a URL (HTTP, file), which then can just be passed through. Or it is fairly small and can be encoded in a data URL, which is included in the HTML output. But otherwise the content needs to be stored in a resource, yielding a resource URL for the renderer. In this decision the display optioncacheis considered. Ifcacheis set toembede. g., a data URL is generated. - How is the resource stored?
A resource can be stored in memory or on disc. Alternatively a resource can referencing an existing file on disc, or contain a URL for the content on another HTTP server. This question is mainly answered by the display optioncache. If the option is not set or set toautothe caching thresholds from the server configuration are applied. Otherwise the value of the option can force a way to store the resource. E. g. with the valuesmemory, ordisc.
Then the pipeline is executed in the following phases:
- In the load phase, the pipeline reads the media content into memory.
- In the transform phase, a requested text transformation is applied.
- In the store phase, content is stored in memory or on disc.
- In the format phase, a BLOB in memory, or path to a local file is converted into a data URL or registered as a resource.
- In the render phase, HTML output is generated for presenting content from a URL.
debug to true.
Then the metadata of the display request processing is displayed as a YAML
document with syntax highlighting.
Under pipeline you can see which action takes place in each phase of the pipeline.Example for HTML content
Given the following display request:
{
  "type": "text/html",
  "text": "<h1>My Headline</h1>"
}
With the default configuration of the Boomack Server, the resulting display options would look like this:
{
  "transformation": null,
  "cache": "embed",
  "renderer": null,
  ...
}
And the pipeline would look like this:
- load: The
textproperty is read as a string - transform: No action here, string is passed on
- store: No action here, string is passed on
- format: No action here, string is passed on
- render: No action here, string is used as HTML output
Example for Highlighted Text
Given the following display request:
{
  "type": "text/x-yaml",
  "src": "file:///home/me/projects/awesome/my-config.yml",
}
With the default configuration of the Boomack Server, the resulting display options would look like this:
{
  "transformation": "highlight",
  "syntax": "yaml",
  "cache": null,
  "renderer": null,
  ...
}
And the pipeline would look like this:
- load: Read the local file into a string
- transform: Apply the transformation
highlight - store: No action here, string is passed on
- format: No action here, string is passed on
- render: No action here, string is used as HTML output
Example for an Image
{
  "type": "image/jpeg",
  "src": "file:///C:/Users/Me/Pictures/Vacation.jpg",
  "options": {
    "cache": "file"
  }
}
With the default configuration of the Boomack Server, the resulting display options would look like this:
{
  "transformation": null,
  "cache": "file",
  "renderer": "image",
  ...
}
And the pipeline would look like this:
- load: Read the property
srcinto a path - transform: No action here, path is passed on
- store: Read the file specified by the path and write it into a cache file
- format: Register the cache file as resource
- render: Render HTML code presenting the resource URL with an
<img src="..."/>tag.
Display Option ↑
Display options influence the way how the media content from a display request
is processed and presented by the web client.
They are stored in the options property of a display request as JSON/YAML map.
The following display options are considered by the media processing pipeline:
transformation: The ID of a text transformation for converting text input into HTML, or"none"to suppress any default transformationrenderer: The ID of a renderer, generating HTML code for presenting a resource URL, or"none"to suppress any default renderingcache: The way to store media content in the Boomack Server. Defaults to"auto"."auto": The system decides by hard coded defaults and the configuration optionscache.memory.autoThreshold.global, andcache.files.autoThreshold.global"embed": Convert the media content into a data URL"memory": Hold the media content as BLOB in memory"file": Store the media content in a cache file
syntax: A code language for syntax highlighting.
Is used by thehighlighttransformation to select the highlight scheme. Supported are the languages of PrismJS. If the optionsyntaxis set and the optiontransformationis not,transformationis automatically set tohighlight.
Text transformations and renderer are provided by plug-ins.
The following display options are instructions for the web client:
extend: Extend existing content in a slot. Defaults to"no". See Content Extension."no": Replace the existing content with the new content. Pushes the existing content into the history, if activated for the slot."begin": Prepends the new content to the beginning of the existing content."end": Appends the new content to the end of the existing content.
scale: Prepares the slot for the presentation of a rectangular media element like a picture."none": The slot is prepared for flowing content with automatic scroll bars."auto": For media typesimage/*andvideo/*scale is set to"contain"in a grid layout and"scale-down"in a document layout."contain": The media element is scaled to fit the slot while respecting the aspect ratio. The content is centered in the slot."scale-down": The media element is scaled down but not scaled up to fit the slot, while respecting the aspect ratio. The content is centered in the slot."fill": The media element is scaled to fill the slot completely with no respect to the aspect ratio."cover": The media element is scaled to fill the slot completely while respecting the aspect ratio. Some of the content may be hidden. The content is centered in the slot.
align: Defines the starting point for the growing content area in the slot.
Is encoded as a string with two words:"<vertical> <horizontal>"- Vertical:
top,middle,bottom - Horizontal:
left,center,right - Example:
"middle center"
The alignment is ignored for non-textual content if
scaleis set to anything else then"none".- Vertical:
iframe: A boolean to indicate that the media content must be presented inside of an IFrame.
Istrueby default, when presenting an URL with content typetext/html.background: A CSS value for the background of the slot.
Defaults to a color from the theme if the border of the slot is active; otherwise transparent.zoom: A floating point number. A number of1.0is considered 100% or no zoom.
Instructs the web client to apply a CSS transformation to the slot content, in order to enlarge or shrink the displayed content.requires: An array of client resource group IDs.
Instructs the web client to load all client resources from all given resource groups.
height: 100% in nested elements.
To make use of the height of the slot in CSS styles, the scale option can be set to contain.
That way the are for the content in the slot is set to a fixed height
and can be used as a vertical reference in nested HTML elements.iframe option can be used.All other display options, not listed here, are interpreted by the activated transformation or renderer.
Content Extension ↑
Usually, if some media content is displayed in a slot, the old content of the slot either is pushed onto the slot history or is discarded. In both cases the slot shows only the new content afterwards.
There are applications however, where you want to extend the already existing content with some more, without loosing it. One useful application for this feature are log messages. You do not only want to see the last log message. But instead you like to see e. g. the last 20 messages. Normally you would have to implement a FIFO buffer in some way. And with every new log message, you would send all messages currently in the buffer to the Boomack Server for display.
Content extensions are an elegant way to implement such behavior
without complex buffering in the API client:
Setting the display option extend to "begin" prepends the new
HTML content to the existing one.
Setting it to "end" appends the new content.
Boomack tracks the number of extensions for the current slot content.
And with the slot property extensions you can
specify the maximum number of extensions allowed in the slot.
If the limit is reached, the oldest part of the content is discarded
— essentially realizing a FIFO queue of HTML fragments inside the slot.
Example for a Content Extension
In this example we limit the number of extensions in the slot to 4, allowing for 5 HTML fragments in total. Then we display the current time every second.
#!/bin/bash
boom panel layout default "{slots: {default: {extensions: 4}}}"
while true; do
    boom -s "<div>$(date +%H:%M:%S)</div>" -t text/html -o extend=begin
    sleep 1
done
boom panel layout default '{slots: {default: {extensions: 4}}}'
while ($true) {
    boom -s "<div>$(Get-Date -Format 'HH:mm:ss')</div>" -t text/html -o extend=begin
    [System.Threading.Thread]::Sleep([TimeSpan]::FromSeconds(1))
}
@ECHO OFF
CALL boom panel layout default "{slots: {default: {extensions: 4}}}"
:loop
CALL boom -s "<div>%TIME:~0,8%</div>" -t text/html -o extend=begin
TIMEOUT /T 1 /NOBREAK >NUL
GOTO loop
extend with the Boomack CLI
are the command line switches --prepend and --append.The display request used by the Boomack CLI here looks like the following:
{
  "type": "text/html",
  "text": "<div>00:00:00</div>",
  "options": {
    "extend": "begin"
  }
}
Preset ↑
Display options can be prepared and stored in the Boomack Server for reference in following display requests.
Sometimes, certain combinations of display options are used very frequently, and sometimes, they can get very large. In both situations it would be helpful if display options could be reused, without transmitting them with every display request.
Presets are exactly that.
A preset is a map with display options stored on the Boomack Server.
It has an ID and can be defined in the initial
server configuration under init.presets.
After the server has startet, presets can be managed with the
Boomack API and with the Boomack CLI
boom preset.
Presets can be used in a display request in the property presets.
And they can be used in media types as well.
Presets have a lower priority then explicit display options. Therefore, if a display request references a preset — setting an option to value A —, and the same display requests sets the same option to value B, value B takes precedence.
Example for Using a Preset ↑
First the preset needs to be created. Here we use the Boomack CLI for that:
boom preset add my-csv "{transformation: csv-table, compact: true, sortable: true, striped: true}"
Then we can use it in a display request:
boom display -f my-data.csv -p my-csv
Which results in the following display request:
{
  "type": "text/csv",
  "src": "file:///home/me/my-data.csv",
  "presets": ["my-csv"]
}
boom display, as well as for boom preset:E. g.
boom preset add my-csv "D:\Projects\My-Project\my-csv-preset.yaml".Media Type ↑
A media type connects a MIME type of the form <main type>/<sub type> with three
pieces of information:
- Is the media content text?
- What presets should be applied by default?
- What individual display options should be applied by default?
If a media type is marked as text, then Boomack uses different defaults
to present the content — showing the content as plain text instead
of a download button from the fallback renderer.
A media type with the main type text is marked as text by default.
Media types can be defined in the initial
server configuration under init.types.
Plug-ins can extend the initial configuration with their own media types.
This is especially useful, if a plug-in provides a transformation
or renderer for a certain media format and additionally provides
a media type to activate and configure the transformation or renderer
with associated display options.
After the server has startet, presets can be managed with the
Boomack API and with the Boomack CLI
boom type.
You can easily specify your own media types or override media types provided
by the Boomack Server or loaded plug-ins.
There is an official registry
for MIME types, which should be considered when choosing a main and sub type
for a certain media format.
If there is no existing MIME type to be used, you can define your own.
But make sure to use the x- prefix in front of your own main or sub types.
Instead of defining a custom main type, it is often enough to use the fairly
generic application main type.
boom type ls lists all media types in the Boomack Server,
and boom type get mainType/subType gives you the YAML representation
of the media type.Example for a Media Type ↑
An example for a user-defined media type is a custom text format.
The csv text transformation from the core-csv plug-in does support
custom delimiters for records and fields.
One can utilize that, to support a hypothetical tabular text format for geo locations
in the following style:
Berlin:52.5186:13.4083|Tokyo:35.6838:139.7744|Cape Town:-33.9252:18.4238
The display options for the media type would look like this:
transformation: csv-table
columns: [ Name, Latitude, Longitude ]
recordDelimiter: '|'
delimiter: ':'
striped: true
{
  "transformation": "csv-table",
  "columns": [ "Name", "Latitude", "Longitude" ],
  "recordDelimiter": "|",
  "delimiter": ":",
  "striped": true
}
If the display options are stored in the file geo-location-options.yaml
the type can be installed in the Boomack Server with the Boomack CLI:
boom type add application/x-geo-locations geo-location-options.yaml --text
To try out the new type we can display some geo locations in the specified format and apply the new media type:
boom display -t application/x-geo-locations -s "Berlin:52.5186:13.4083|Tokyo:35.6838:139.7744"
The result is a nice HTML table with striped rows.
Action ↑
An action is some kind of program that is executed inside, or called by, the Boomack Server. An action has an ID, takes a JavaScript value as input and returns a JavaScript value as output. Input and output can be anything from strings, or JSON objects, to typed arrays. The implementation of an action is defined by its action type.
An action is called from JavaScript in the browser with the function
boomack.action(id, payload[, cb]).
It takes the input for the action as payload parameter.
It also takes an optional callback function with the signature
function (error, result).
And to support the await keyword, it returns a promise.
By default, a Boomack Server has a couple of action types from the core
plug-ins, but no actions using them. Plug-ins can provide initial actions, but
usually do not. The server configuration can contain
initial actions as well under init.actions.
After the Boomack Server has started,
actions can be managed — created, updated, and deleted —
with the Boomack API
and with the Boomack CLI boom action.
shell action type from the plug-in core-shell e. g.
allows the execution of shell commands on the Boomack Server.
This can be very useful in some scenarios and very dangerous in others.
Therefore, the API routes for managing actions are deactivated by default
and only the initial configuration can be used to set up actions.
You must activate the API routes with the configuration option api.enable.actions.
E. g. on the command line: boomack -o api.enable.actions=true.Example for a Shell Action ↑
To use actions in practice the following steps must be taken:
- Start the Boomack Server with
api.enable.actions=true - Create an action with the Boomack CLI
- Display HTML with JavaScript code, calling
boomack.action(...)
Creating an action with Boomack CLI:
boom action add my-action "{type: shell, command: node, args: ['my-script.js']}"
You can use an absolute path for my-script.js here if you like.
If it is relative, it is interpreted relative to the working directory
of the Boomack Server.
Do not worry about the fact, that the file does not exist yet.
We will create it later.
When the action is called, a new node process is started
with the command line argument my-script.js.
To call the action from JavaScript in the browser, the following code can be used:
const result = await boomack.action('my-action');
To display a button which triggers the action and shows the result, you can use the following HTML snippet:
<script>
  async function triggerUpdateAction() {
    const result = await boomack.action('my-action');
    document.getElementById('result-status').innerText = result.status;
    document.getElementById('result-stdout').innerText = result.stdout;
    document.getElementById('result-stderr').innerText = result.stderr;
  }
</script>
<a class="ui button" href="#" onclick="triggerUpdateAction()">
  Run My Script
</a>
<h2>Result</h3>
<p>Exit Status: <span id="result-status"></span></p>
<h3 class="ui blue header">STDOUT</h3>
<pre><code id="result-stdout"></code></pre>
<h3 class="ui red header">STDERR</h3>
<pre><code id="result-stderr"></code></pre>
You can save the HTML snippet to a file action-trigger.html
and display it with the Boomack CLI:
boom display -f action-trigger.html -o iframe=false
iframe=false is needed here, to deactivate
some default behavior of the Boomack Server:
If the Boomack CLI detects, that the Boomack Server
runs locally, and therefore, can reach the file action-trigger.html
directly in the filesystem,
it transmits the path of the file as file URL.
And if the Boomack Server gets a display request with an URL
and the media type text/html,
it assumes the target of the URL is a complete web page
and automatically activates the iframe display option.
The iframe=false essentially tells Boomack to handle
the file as an HTML fragment instead of an HTML page.If you now click on the button Run My Script in the browser,
an error will be displayed below “STDERR”,
because the my-script.js script does not exist yet.
The NodeJS process started but could not find the script,
and therefore, wrote the error on its error stream.
Now, save the following file my-script.js under the path you used
in the args property when creating the action:
my-script.js:
console.log('I am the running action!')
Click the button Run My Script again, and you will see the output
of my-script.js below “STDOUT”.
Evaluation Request ↑
An evaluation request sends JavaScript code to all browser tabs or windows, currently showing a specific panel — and are connected to the Boomack Server with healthy a Web Socket connection. The browser simply evaluates the given code in the context of the panel page.
This feature can be used for updates on the panel, which are supposed to be volatile. An evaluation request does not change the state of the slots content on the Boomack Server. As a result, a reload of the panel in the browser will discard any potential changes made by the evaluated code.
Evaluation requests can be made with the Boomack API
and the Boomack CLI boom eval.
Evaluation requests are blind fire-and-forget requests. A large number of browsers could be showing a panel at the same time. And there is no result returned from all of these browsers back to the Boomack Server after evaluation of the sent script. Therefore, the route does not return any result. In fact, currently, the implementation of the eval routes, does not even wait for the evaluation in the browsers. It just queues the eval commands in the Web Socket connections to the web clients and returns immediately.
boomack.action(...) and send data back through
an action this way.Example for an Evaluation Request ↑
The following request sets the color of the panel title
to green and then shows a message box.
It actually contains two evaluation requests
to target all browser tabs or windows, which are currently
showing the panels default or panel-X.
- script: |-
    document.querySelector('.panel-header h1')
    	.classList.add('green');
    alert('Hello Default Panel');
- panel: panel-X
  script: |-
    document.querySelector('.panel-header h1')
    	.classList.add('green');
    alert('Hello Panel X');
[
  {
    "script": "document.querySelector('.panel-header h1')\n\t.classList.add('green');\nalert('Hello Default Panel');"
  },
  {
    "panel": "panel-X",
    "script": "document.querySelector('.panel-header h1')\n\t.classList.add('green');\nalert('Hello Panel X');"
  }
]
The Boomack CLI does not support sending multiple evaluation requests in one request. Therefore, two calls are needed to target both panels:
boom eval "document.querySelector('.panel-header h1').classList.add('green'); alert('Hello Default Panel');"
boom eval -l panel-X "document.querySelector('.panel-header h1').classList.add('green'); alert('Hello Panel X');"
Persistence ↑
By default the Boomack Server does not persist any content or configuration state, created by API requests. This means if you start a Boomack Server, send a couple of layout and display requests and then restart the server, all changes made by the layout and display requests are lost.
This volatile behavior is the default configuration because, if the server is used locally in a development scenario, resetting the state of the Boomack Server as a display, usually is not lost but preferred to have clean starting point.
However, if persistence for the panels, slot content,
actions, presets, and media types is needed,
it simply can be activated with the configuration option
storage.mode = snapshot-files.
E. g. by starting the Boomack Server with the command line switches
boomack -o storage.mode=snapshot-files.
The Boomack Server then stores a snapshot of its state in a regular
interval to the filesystem.
The interval is controlled by the configuration option
storage.snapshotInterval, which expects a number of seconds as value.
The snapshot files are stored in a directory specified by
the configuration option storage.location.
By default, this is the directory state inside the
working directory of the server.
--reset
at the start of the Boomack Server.Export ↑
The Boomack supports exporting all panels, an individual panel, or an individual slot as a static HTML web page.
There are two kinds of exports, supported by Boomack:
- ZIP archive as download for a panel viewer, containing only one panel with all slots
- Export of all panels, an individual panel, or an individual slot as a static web page into the filesystem of the Boomack Server
A whole panel can be exported by a viewer by using the download button in the toolbar of a panel.
The result is a ZIP file. Containing an index.html and all necessary resources
for the page to load correctly.
After extracting the ZIP file into a folder in the filesystem,
the index.html file can be opened with a browser.
With the Boomack API and the Boomack CLI boom export
the second kind of export can be carried out.
Example for an Export ↑
In this example, we export all panels to the directory /var/www/html/boomack.
This is useful to be able to publish the current state of all panels and slots
with an HTTP server like Apache HTTP Server
or NGiNX.
First, the export to the filesystem of the Boomack Server needs to be activated,
by specifying a base directory for the export in the server configuration.
In this case we start the Boomack Server with the command line switches
-o api.enable.export=true export.local.location=/var/www/html.
With the Boomack CLI we can now export all panels to the sub-directory boomack:
boom export all --path boomack --theme dark
When exporting all panels, one HTML file with its ID as filename is created for every panel.
The panel default therefore, is exported to the file default.html.
An index.html file with a list of all panels — similar to the home page
of a Boomack Server — is currently not created.
If we have NodeJS with npm installed, we can quickly start a HTTP server like this:
npm install --global node-static
cd /var/www/html/boomack
static -p 8000
Then we can open the URL http://127.0.0.1:8000/default.html in the browser to display the default panel.


